EC-CUBEでカテゴリページに説明文を追加する方法

本日、EC-CUBEでカテゴリページに説明文を追加する方法を聞かれたのでやり方をメモ。どなたかのお役に立てれば幸いです。

手順
1.データベースにカラムを2つ追加
2.管理画面から追加・編集できるようにする
3.カテゴリページで説明文を表示
以下のサイトを参考にさせていただきました。感謝
EC-CUBEでプラグインを使わずに”カテゴリ説明文”を追加する方法
データベースにカラムを2つ追加
まずはdtb_categoryテーブルに以下のカラムを追加します。
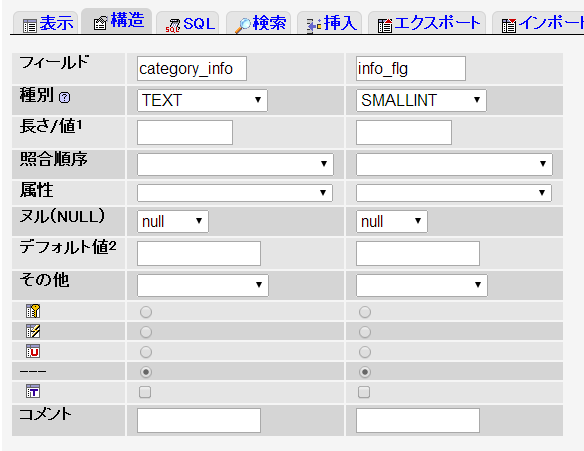
カラム名: category_info データ型: text
カラム名: info_flg データ型: smallint
それぞれ「ヌル(NULL)」に「null」を設定し保存します。
管理画面から追加・編集できるようにする
カテゴリ編集ページにテキストフィールドを追加します。
/data/Smarty/templates/admin/products/
category.tpl
59行目付近の<div class="now_dir">の直下に下記コードを追加します。
<!-- カテゴリ説明文-->
<div>
<textarea name="category_info" cols="110" rows="15"><!--{$arrForm.category_info|escape}--></textarea><br />

<!--{if $arrForm.level != "1" && $arrForm.parent_category_id != "0"}-->
<input type="checkbox" name="info_flg" id="info_flg" value="1"<!--{if $arrForm.info_flg}--> checked="checked"<!--{/if}--> /><label for="info_flg" class="fs10n">親カテゴリの説明を引き継ぐ</label><!--{/if}-->

<span class="red10"> (上限<!--{$smarty.const.LLTEXT_LEN}-->文字)</span>
</div>
/data/class/pages/admin/products/
LC_Page_Admin_Products_Category.php
408行目付近のpublic function initParam()関数の中に下記コードを追加します。
$objFormParam->addParam('カテゴリ説明', 'category_info', LLTEXT_LEN, 'KVa', array('SPTAB_CHECK', 'MAX_LENGTH_CHECK'));
$objFormParam->addParam('カテゴリ説明flg', 'info_flg', INT_LEN, null, array());
447行目付近のpublic function updateCategory()関数を以下に書き換えます。
public function updateCategory($category_id, $arrCategory)
{

    $objQuery =& SC_Query_Ex::getSingletonInstance();

    $arrCategory['update_date']   = 'CURRENT_TIMESTAMP';

    $objQuery->begin();
    $where = 'category_id = ?';

    //追記:親の設定を引き継ぐ時
    if($arrCategory['info_flg']) {
        $parent_category_id = $objQuery->get("parent_category_id", "dtb_category", $where, array($category_id));

        $arrCategory['category_info'] = $this->lfGetParentInfo($objQuery, $parent_category_id);
    }

    $objQuery->update('dtb_category', $arrCategory, $where, array($category_id));
    $objQuery->commit();
}
ファイルの最後の}の前に関数を追加します。
 // 追記:親のcategory_infoを取得する
    public function lfGetParentInfo($objQuery, $pid) {
        $where = "category_id = ?";
        $parent_info = $objQuery->get("category_info", "dtb_category", $where, array($pid));
        return $parent_info;
    }
これで管理画面の設定は完了です。
カテゴリページで説明文を表示
次に表示ロジックをカスタマイズします。
data/class/pages/products/
LC_Page_Products_List.php
189行目付近のpublic function lfGetCategoryId()の最後に以下を追記します
// 追加:カテゴリ説明
$objQuery = new SC_Query();
$this->category_info = $objQuery->get("category_info", "dtb_category", "category_id = ?", $arrCategory_id);

return $arrCategory_id[0];
/data/Smarty/templates/default/products/
list.tpl
取得した説明文を表示する箇所を指定します。これは好きなところに入れて大丈夫です。
<!--{$category_info}-->
OGPを設定して、Facebookでシェアした時の情報を指定
/data/Smarty/templates/default/
site_frame.tpl
htmlタグに属性を追加します。
<html xmlns="http://www.w3.org/1999/xhtml" lang="ja" xml:lang="ja"
 xmlns:og="http://ogp.me/ns#" xmlns:fb="http://www.facebook.com/2008/fbml">
商品詳細ページのhead内にOGP用のmetaタグを指定します。
<!--{assign var=detail value="`$smarty.const.TOP_URLPATH`products/detail.php"}-->
<!--{if $smarty.server.PHP_SELF==$detail}-->
<meta property="og:title" content="<!--{$arrProduct.name|escape}-->" />
<meta property="og:type" content="product" />
<meta property="og:image" content="<!--{$smarty.const.HTTP_URL}-->upload/save_image/<!--{$arrProduct.main_list_image}-->" />
<meta property="og:site_name" content="<!--{$arrSiteInfo.shop_name|h}-->" />
<meta property="og:url" content="<!--{$smarty.const.HTTP_URL}-->products/detail.php?product_id=<!--{$arrProduct.product_id}-->" />
<meta property="og:description" content="<!--{$arrProduct.main_list_comment}-->" />
<meta property="fb:app_id" content="あなたののapp_id" />
<!--{/if}-->
これでOGPの設定も出来ました。
まとめ
EC-CUBEは少しの調整で初心者の方でもカスタイマイズできるようになっています。
非プログラマの方が修正しやすいように、少しでもお役に立てれば幸いです。
※EC-CUBEのバージョンは2.13系を使用しています。
他のバージョンでも考え方は一緒ですので参考にしてみてください。
最新情報をお届けします